 |
| Geoboard Design Center - A natural 2-handed activity |
What OT doesn't like a natural two-handed activity like the Geoboard Design Center? Whether you're stabilizing the board with one hand and placing the rubber band with the other, or stretching the rubber band for placement with two hands, it's just plain fun.
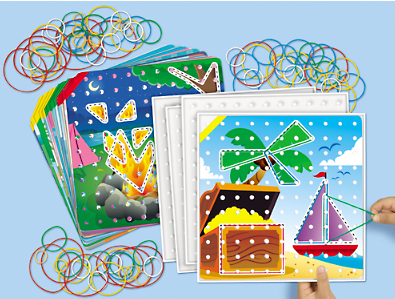
The goal when playing with the Geoboard Design Center is to stretch a rubber band around each different shape on a picture and attach it to the pegs, staying on the dotted lines. The plastic boards are white and are an 11 x 11 grid of pegs. The pegs flare out a little at the tops so the rubber bands don't slip off. I have not had a board break or a peg break off in several years of use.
The picture cards are bright and colorful and the subject matter is kid-oriented. The cards start with large basic shapes (squares, triangles) and increase in difficulty by adding more irregular shapes and shapes that overlap. Each shape is outlined with dotted lines to show you where to put the bands. The cards are not numbered for difficulty so you will have to judge. For quick use, you could number them on the back so that they increase in difficulty as you go, 1-20. Pictures
will only fit on the geoboards going in one direction. I put a tiny
mark on the top left hand corner of each board so I can orient the board
quickly each time I use it.
Regular type rubber bands of a variety of sizes are included. I have used this a lot and have replaced some of the rubber bands with store bought bands. The bands you will get are colored, but they do not match the colors on the pictures. If you have the rainbow bracelet maker, an unrelated item that was popular a couple of years ago, you can use those small rubber bands too.
I felt this was well worth the money and most kids have enjoyed working with it. I purchased from Lakeshore Learning. I happen to have a store in my area, but if you don't you can also find them online.
To read about more pegboard games and toys that I have blogged about, click here.
Try this:
- Look at the picture before putting the bands on and point out the dotted lines where the rubber bands will go.
- Model putting a band on a shape, then take it off and ask the individual to do it.
- Model how to stretch a band between two pegs and how to work out from there.
- Stretch the band to the next peg if the individual does not see where to go next. Then undo it and ask him to do it.
- Give the individual smaller and smaller rubber bands for the same picture to keep challenging and working on finger strength.
- Let the individual judge what size rubber band to use for each shape.
- Let the individual make his own picture on a blank, white geoboard.
- Number the pictures on the back so that they increase in difficulty. Then work on the pictures from easiest to hardest (1-20).
- Allow the individual to choose the picture he will make. If he tends to choose pictures that are too difficult, lay out three or four appropriate pictures and let him choose from those.
- Work
on visual discrimination, visual closure, figure ground, spatial
relations, eye-hand coordination, pincer grasp, manual dexterity, finger
strength and dexterity, coordinated use of both hands, fine motor
precision, play exploration and participation
In the box: 4 plastic geoboards, 20 pictures, 90 rubber bands
If you would like to purchase this item or just find out more information, go to this website www.lakeshorelearning.com.


No comments:
Post a Comment
Thank you for taking the time to comment.