
 |
The new Spirograph - Spirograph Cyclex |
Spirograph was first introduced in the US in 1966 and was billed as a toy for drawing a "million marvelous patterns". We had one when we were kids. The patterns you can make are cool, but I was never able to complete one without messing up. Spirograph Cyclex is a different version altogether, and I finally had success!
If you are looking for an activity that requires a stabilizing hand, or a way to sneak a writing tool into a kid's hand, this could be it. As you can see on the box lid above, there is only one hand pictured (with something of an awkward grip), but you must use the other hand to hold down the red drawing tool as you work.
The difference between Spirograph Cyclex and the original Spirograph is the red drawing tool.
It holds the wheels in place so they can't jump the track.The red tool and the wheels are all one piece and do not come apart, although the wheels do turn as you draw. It may look complicated, but it is not. The wheel you are using will move slightly after you draw around the shape once, then twice, on and on. That's how you get the overlapping effect without any effort on your part for moving the wheel.
Below is the design I made. I drew two different shapes, one in red, one in purple. I will note that my hand got tired and I had to stop a couple times to rest it. If you do this, don't move the hand that is holding down the red tool. The red marker started out darker and then got lighter as I went, so the first circle stands out. The six markers included are not of the best quality and I don't think they will last that long, but you can use other writing/drawing tools.

The instructions for drawing:
- Place the red drawing tool on a piece of paper. Choose a marker and place it inside the shape you want to trace, on the edge.
- Hold the marker vertically and trace the shape, around and around, over and over, until you meet the line where you started.
- Add to your design by holding the drawing tool in place, choosing another colored marker, and placing it in another shape in the same wheel. Repeat step 2.
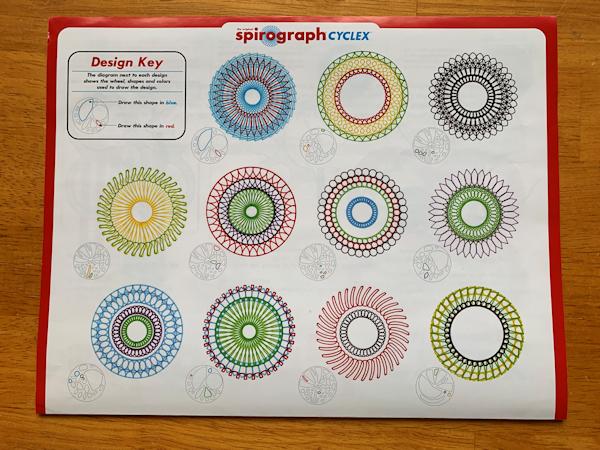
Here are some design examples that will get you started. Then just let your imagination run wild.
Try this:
- Use sharpened colored pencils, or fine tip pens and markers. Sharpie has a nice fine point marker. I wouldn't think that colored pencils would vary in darkness if kept sharpened, and would probably be your cheapest option.
- Try putting a pencil grip on the writing tool to encourage a functional, dynamic grip.
- Remember that the bigger the shape, the fewer times you will need to draw around it. Start a beginner with a couple of large shapes, then medium. Too many small shapes on one design will be tiring and tedious, and may just turn out muddled looking.
- Write a sentence or two about your design when you are done, while the tool is still in the individual's hand, if you are working on writing.
- Work on functional grip, tool use, coordinated use of both hands, creativity, process skills, spatial skills, play and leisure exploration and participation.
In the box: Drawing tool, 20 pieces of paper, 6 markers
No comments:
Post a Comment
Thank you for taking the time to comment.