-->

Children learn through play. As an occupational therapist who works with children and youth, I use games and toys almost every day to help develop important cognitive, visual perceptual, motor, sensory, social, play and leisure skills. While many different types of activities can be used in therapy, this blog focuses on off-the-shelf games and toys that are accessible to most. Whether you are a therapist, parent, teacher, or a game lover like me, I hope you discover something useful while you are here. Learn a different way to play a game you already own or discover a new game for your next family game night. Either way, just go play. It's good for you!

The OT Magazine named The Playful Otter one of the Top 5 Pediatric OT Blogs.


Aug 27, 2018

Candy Land The Train Game

Chug along the tracks to make a candy match.
Work on visual discrimination, eye-hand coordination, visual tracing, manual dexterity, in-hand manipulation, palmar arch development, executive functioning skills, socialization skills, process skills, play and leisure exploration and participation

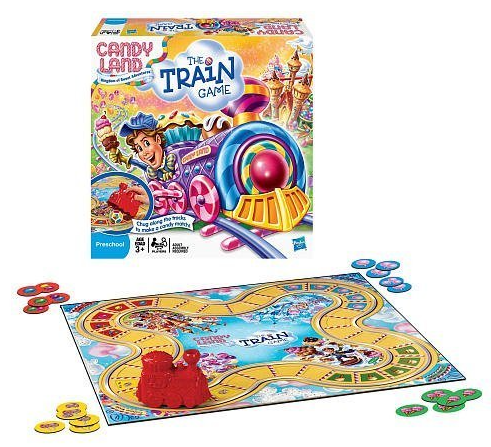
In the box: Game board, plastic train, custom die, 20 tokens

Candy Land Train is made by the makers of the classic Candy Land board game, but other than that, it doesn't remind me much of Candy Land. The game board for Candy Land Train has four stations, one in each corner. You can see on the image above that each station has tokens that are a different color (red, blue, green, yellow). Each station also has just one type of treat (cotton candy, gum ball, ice cream cone, sucker). Each of the tokens will show either one, two or three of the items.


The goal of the game is to travel around the board and collect a treat token from each train station (any one of each color). Your journey will be via a red, plastic train engine. The train is hollow and will be placed on top of a 12-sided color die before chugging off. Four sides of this die have all four colors on them, these are the rainbow sides. The other eight sides each have only one color on them. The die is a lightweight plastic and the colors on the die are stickers. The die will tumble under the train as it moves so that you will never know which color will be up when you lift the train.


Object: 
Be the first player to collect a candy token from each train station.

Set up: 
Place the board in the middle of the players. Place the die anywhere on the tracks and place the train on top of it. 

Play:
The first player pushes the train to any of the four stations. Check the color of the token that is available at that station. Now lift the train and see if the color on the top of the die matches the color of the token. If it does, take a token. Now you only have three left to collect. If a rainbow side is showing, you can collect a token no matter which station you are at since it covers all four colors. If it does not match, place the train back on top of the die and the next player pushes the train to any of the stations. The train can move in either direction and can be pushed to any station on any turn. As you collect tokens, push the train only to the stations where you still need to collect a token.

Alternate Play:
Play as above, but each time you collect a token choose a token that pictures the most pieces possible. For instance, if there is a token with one gum ball and a token with three gum balls available, take the one picturing three gumballs. Play until all the tokens have been taken. Then each player counts the number of treats pictured on the tokens. The one with the most treats is the winner.

Try this:
  • Skip the game and play with the tokens, sorting them into piles by either color or number of items. Hold several in the dominant hand and push them out with the thumb one at a time to drop into piles.
  • Push the train to the stations, but keep the die out. Cup the hand and hold it in that position as you roll the die for several seconds. Then throw onto the playing surface.
  • Stack the coins by each station. Can you pick the top coin off the stack without disturbing the others?
  • Place the coins one-high on the playing surface before clean up. Pick them up one at a time and squirrel into the palm. How many can you hold? Put them back into the box by the handful.
  • Follow the directions from the suggestion above, but this time you call the color each time for the individual to pick up. Or let the individual name the color each time he picks up a token.
  • Trace visually the path you will take before pushing the train ahead each turn.

Aug 26, 2018

Sticky Mosaics

Add stickers to pictures by color and number.


Sticky Mosaics by number kits have been a favorite of mine over the years. This craft is good for fine motor precision and visual perceptual skills. However, if you buy your own supplies like I do, they can be a bit pricey. I usually buy mine at Hobby Lobby where they go for $12.99 a box. Each box usually has 4 projects in it. I use my 40% off coupon that they publish weekly and end up paying about $2.00 per project. Not too bad considering you can draw them out over several sessions. I work with a young man who just completed a dinosaur picture last week. We had worked on it for about 20 minutes a session for about 8 sessions. Others, of course, will go faster. I usually switch colors or numbers several times during a session so that the individual gets additional practice looking at the key and matching colors and numbers.

For years Sticky Mosaics have come in the colorful boxes you see above with the cats and the butterflies. Fairly recently they have switched to the packaging you see with the dinosaurs, which has a lot more white space on it. You will still see both packaging on Amazon.

Another change they have made recently is they have added round stickers. Traditionally they have used square stickers and often included plastic gems. The square stickers came in multiple colors and textures. The gems were usually round or simple flower or oval shapes and came on a plastic sheet. The kids liked the gems and they were a pretty touch. They tended to be small, but lifting them from the plastic sheet, where they were positioned with space between them, was much easier than lifting the circle stickers that they have now. The square stickers are side by side and once you pick up the first one or two, getting your fingers under the next sticker in line is not too difficult. However, the circle stickers they are making now have space between them, meaning that you either have to push each stick out from the back so you can grab the edge or fold the whole square across so that the very tops of the stickers pop up and you can try to grab them from there.


Each placement for a sticker on a picture is numbered and each box comes with a key showing which color goes with each number. There is also a key printed on paper that comes inside the box. In the image above you can see that the stickers come on squares. They are all sticky, just pick one up and put it on the picture.

Left: This dinosaur picture is half completed. Right: The key with my stickers added.

  
The first thing I do when I open a new set is to place an actual sticker above each number on the key. Some of the colors or textures may be close and may be hard to distinguish otherwise (for some kids).

This craft is very popular with the kids.

Try this:

  • Start a new square of stickers by taking off the first couple. Demo how to take them off one at a time.
  • Work on numbers by placing stickers on all number ones first, then all number twos, etc.
  • Announce a number and ask the individual to determine which sticker matches that number. Allow the individual to then scan the picture to find that number and cover a few (or all).
  • Switch numbers several times during a session so that the individual gets practice looking at the key and identifying colors and finding new numbers on the picture.
  • Hand the individual a square of stickers. Ask him to look at the key, find out which number is associated with that color and cover a few.
  • Ask the individual to hold the stickers in the non-dominant hand and pick them off and place them with the dominant hand.
Work on visual discrimination, spatial relations, figure ground, eye-hand coordination, visual scanning, fine motor precision, manual dexterity, coordinated use of both hands, executive functioning skills, process skills, color and number identification, play and leisure exploration and participation

In the box: Usually 4 projects and stickers. Check specific box contents before purchasing.