-->

Children learn through play. As an occupational therapist who works with children and youth, I use games and toys almost every day to help develop important cognitive, visual perceptual, motor, sensory, social, play and leisure skills. While many different types of activities can be used in therapy, this blog focuses on off-the-shelf games and toys that are accessible to most. Whether you are a therapist, parent, teacher, or a game lover like me, I hope you discover something useful while you are here. Learn a different way to play a game you already own or discover a new game for your next family game night. Either way, just go play. It's good for you!

The OT Magazine named The Playful Otter one of the Top 5 Pediatric OT Blogs.


Apr 14, 2019

Hands Down

Hands Down - Be fast to hit the Slam-O-Matic when the hands start going down.
We had Hands Down when I was a kid and it brings back fun memories. Up to four people can play, and the more that play, the more fun it is. Speed will be a must to win this game.

This game consists of cards and the Slam-O-Matic that you see in the image below. There is one joker card and the rest of the cards each have one number printed on it, between 1-10. The Slam-O-Matic is plastic and has four hands that can be pushed down. When a hand is pushed down, the colored tab (of the same color) that you see sticking up in the middle will go down also. 

Players take turns drawing cards, trying to make a set of two of the same number. When a player is holding a set, he hits the plastic hand that is in front of him, causing the plastic tab of the same color to go down. You can see this in the image above. The boy in front of the red hand has pushed down his hand and the red tab has gone down also. This cues all the other players to quickly hit their plastic hands. The slowest person's tab will end up on top and he will lose one card. As many times as we hit those hands, hard, the Slam-O-Matic never did break.


Object:
Have the most points at the end of the game.

Set up: 
Set the Slam-O-Matic in the middle of the players so that each player is near one hand. Shuffle the cards and pass out four to each player. Place the face-down deck near the Slam-O-Matic.

Play:
The first player starts his turn by taking the top card off the draw pile. If he has a match (two of the same number cards) in his hand he can hit his Slam-O-Matic hand. This is called a "Hands Down". All other players hit their hands as fast as they can. The person who was last to hit his hand (his tab will be on top of the pile in the Slam-O-Matic) must allow the person who is playing to draw one card from his hand. If the player gets another set with this new card, he can go for a Hands Down again. He can keep playing as long as he wins and draws a matching card from another player. Each player can also fake a Hands Down as many times as he wants on his turn by pretending to go for a Hands Down, but not actually touching the plastic hand. Any other person that thinks the player is going for a Hands Down and actually touches or hits his hand, must allow the player to draw one card from his hand.

The joker is never played as a set and is only used in scoring. After the cards run out, players will start picking one card per turn from each other until all cards have been played except the joker. This ends the game. Players count their score - each set is worth one point and the joker is worth 2 points.

Try this:
  • Work on visual discrimination, eye-hand coordination, manual dexterity, shuffling/dealing/fanning cards, quick reflexes, executive functioning skills, process skills, socialization skills, play and leisure exploration and participation
In the box: 1 Slam-O-Matic, 41 cards

If you are interested in purchasing this game or just want more information, click on the image below.

Apr 12, 2019

Diamond Painting

Diamond painting.


The newest craft craze around here is Diamond Painting. I noticed it first at Michael's Craft Store about a year ago. It took Hobby Lobby months to get them in, but you can get a few there now too. Amazon has lots and lots of them. This craft will require a steady hand, good vision, figure ground skill, ability to match a pattern to a key and close work. The Diamond Dotz brand is expensive and you can get them cheaper on Amazon by searching under diamond painting.

The canvas is a very sticky surface. You will get multiple different small bags, each a different color of diamonds, and each will have a number stamped on it.
The diamonds are really half diamonds so that they sit flat on the canvas. They are tiny, plastic and multi faceted, so when you look at your work under a light the diamonds really sparkle. Take note before you order if the diamonds are round or square. The vast majority I have seen are round, but some have square diamonds. The round can be picked up and put down easily. The square take more precision as they must be oriented in a certain direction before placing them onto a square box

The canvas has a grid of many small boxes printed on it. Each box has a symbol, letter or number in it. Down the side of the canvas is printed a key that will show you each symbol/letter/number and the bag number it corresponds to. You will put that color of diamond on that spot.

Also included is a pencil-type tool and a little square of wax. Push the tool tip into the wax and then touch it to the top of a diamond. The wax will make the diamond stick to the tool. Then place the diamond on a corresponding box on the canvas. Because the canvas surface is so sticky, the diamond will stay in place where you put it. Do this over and over until the picture is complete. You don't have to touch it to the wax very often, just when they don't seem to be sticking to the tool any more.

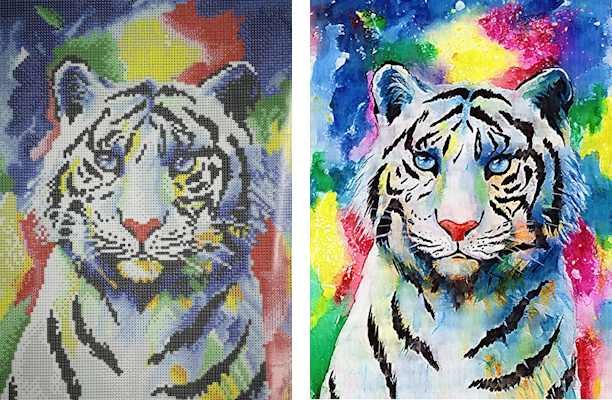
Some of the canvases are completely covered with diamonds, other pictures feature only certain objects that will be covered by diamonds and the rest of the canvas is printed. The words "full drill" in the description is supposed to mean that the entire canvas will be covered with diamonds.

Left: The canvas showing the grid on the entire surface - full drill. It does not show the symbols in the boxes.       Right: The original picture. This one turned out beautiful.

The picture comes with a piece of clear plastic over the grid, since it is sticky. I recommend not taking the plastic all the way off or you end you laying your hand in it over and over to stabilize/rest your hand as you work. If you do take it all the way off, remember which side was up. You would think both sides are the same, but I had someone take it all the way off and then we put it back on the wrong side and it stuck like glue. I didn't think we would ever get that plastic back off. It was a fight.

I work with a few kids that are absolutely hooked on this craft. I have kids from both level ASD2 and ASD3, down syndrome and moderate cognitive disability who love it. I tried it myself and found it tedious, in part because my eyes are not good enough to see the symbols in the small boxes from a distance. I guess that just comes with age. :( 

Try this:

  • Work on visual discrimination, eye-hand coordination, visual scanning, figure ground, manual dexterity, fine motor precision, tool use, spatial relations, executive functioning skills, process skills,  play and leisure exploration and participation

If you're interested in checking it out further, click on the image below.