-->

Children learn through play. As an occupational therapist who works with children and youth, I use games and toys almost every day to help develop important cognitive, visual perceptual, motor, sensory, social, play and leisure skills. While many different types of activities can be used in therapy, this blog focuses on off-the-shelf games and toys that are accessible to most. Whether you are a therapist, parent, teacher, or a game lover like me, I hope you discover something useful while you are here. Learn a different way to play a game you already own or discover a new game for your next family game night. Either way, just go play. It's good for you!

The OT Magazine named The Playful Otter one of the Top 5 Pediatric OT Blogs.


Apr 11, 2021

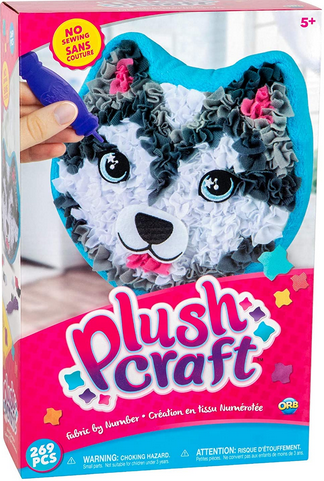
Plush Craft

Plush Craft Kit - Everything you need is in the box.

I am surprised how many crafts are now available on Amazon. I was lamenting in my last post about the raise in prices and lack of new options in my local craft stores. Amazon did not used to be a place where you could get much, value wise, in crafts. I had some time today, so started looking around, and actually ordered a few new things. I'm wondering if this new influx of crafts is from China, as I don't recognize many of the brand names. This one is from Orb toys. I thought it might be the manufacturers of my favorite Sticky Mosaic crafts, but it's not.

The kids really like this Plush Craft kit. I like it because it has a hand tool, the kids end up with a small plush toy when they are done, and everything you need comes right in the box.

Everything you need.


The plush toy is already stuffed and sewn together, ready to be decorated. It is not real big, this dog measuring about 7.25" x 7.25". Each of the small circles you see on the dog has a number printed on it. In the middle of each circle is an X shaped cut. The purple tool will be used to force open the cut and push the cloth piece down into the hole.

The material pieces are thin. There are four colors for this craft. Included is a piece of paper with a color-number guide printed on it. Each of the numbers from the craft is assigned a different color of material. For instance, number 1 is white, number 2 is light grey, and so on.

To make the craft:

  • Choose a number on the dog.
  • Find the appropriate color for that number.
  • Place the piece of material over the circle.
  • Push the cloth into the circle with the tip of the purple tool.

Yes, the cloth will cover the circle you need to punch through. This is what the kids had the hardest time getting use to, but after doing a few got incredibly good at estimating. Do this over and over until the craft is finished. Once kids got the knack of it, they were able to move pretty fast.

This kit comes with a nose and two eyes. They are separate pieces to add at the end. Also included is one self-adhesive Velcro dot for each piece. Stick it on the back of each piece and then press them on the pillow. Not sure how well they will stay as I just started using this craft. You could also just glue them on (glue not included).

I started with the ice cream cone because it was the cheapest. It is also about half again as big as the dog. I bought the dog for someone who has a husky. There are even more options today for images that I saw a few days ago. The craft does cost about $10, but you can use it over several sessions.

I will come back in a couple weeks when this project is done and update with a finished picture and report on how the facial features stuck.

Try this:

  • Puncture each hole with the tool before pushing the cloth in, to break open the cut, if kids struggle pushing the tool into the hole.
  • Do all of one color/number, then move on to another color. This is probably the fastest way to go.
  • Sort the cloth pieces before you start working so you won't have to keep stopping to find your color piece. They come all mixed together in a bag.
     

Apr 8, 2021

Sequin Art


Sequin Art - Fine motor precision required

Sequin Art is a great craft kit for fine motor skills. You will be working with small pieces and repeating a sequence of movements over and over.

This kit comes with a thick piece of styrofoam and a colorful picture (see note below). Lay the picture on the styrofoam. Pick up a small sequin, push a small straight pin through the hole in the middle of the sequin, then push it on a circle of the same color on the picture. That's it. Do this over and over to create a colorful, sparkling picture. You can see an image of someone ready to pin the sequin in the upper right hand corner of the box (image above). Check it out to see the sizes of the pieces. If you would like to see it in more detail, go to Amazon and click on the image. Then use the magnifying glass to enlarge it.


Showing the size of the picture and the white styrofoam behind it.
 

I'm finally going back to work in person and this is the craft I am going with. The Sequin Art brand is a little pricey with most kits running between $18 and $25. However, one picture will take many hours to complete. I bought one kit and will have several kids work on it a few minutes per session. So this one picture will last me awhile. 

Reasonably priced crafts and craft kits are getting hard to come by. Michael's has almost doubled the prices of their crafts and crafts kits around here and they no longer offer the 40% off coupon each week. Hobby Lobby seems to offer the same craft line year after year and I no longer have a big enough caseload to justify buying crafts from Oriental Trading in 12 packs.  Plus their prices have risen significantly also. So even though this one craft kit was $25, I will get a lot of use out of it.

Each color of sequins comes in a small cellophane bag, with no way to re-close it after opening. I buy the small plastic bags from Hobby Lobby and put each sequin color in its own resealable bag. Those small bags come in handy for lots of stuff. 

The size of the picture in this kit is 9 3/4" X 13.5". I don't know if all the kit sizes are the same. If the description on Amazon does not say, I usually scroll down and look at the product information. They will tell the size of the package and you can get a general idea.

NOTE: There are lots of different pictures to choose from. I see that they have started making some of the pictures with all white dots, instead of colored sequins printed on the picture. If there are only white dots, you will have to use the image on the box to know which color to put where. You can tell how each kit is printed by looking at the circle in the top right hand corner of the box. Trying to follow the colors from the box image would be way too tedious for my kids, so I only buy the kits that have the sequins printed in color on the picture.

Engaging in this craft kit may be quite tedious and frustrating to the wrong person.

 Try this: 

  • Demonstrate what to do and let the individual follow you.
  • Place a few pins on the table top and separate them if the individual will have trouble picking them up or doesn't like to be poked.
  • Place a pin in each sequin for the individual if they are not capable of doing that part. Lay the units on the table top and let them pick each one up and place it on the picture.
     
In the box: 1 large pieces of styrofoam, 1 picture, bags of sequins to match the colors needed for the picture, bag of short straight pins